Creating Personalized Student Photos
with QR Codes
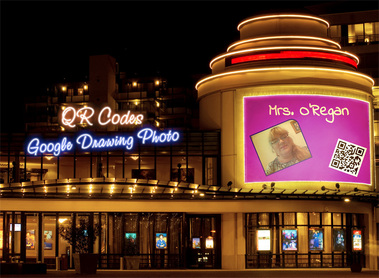
There are a great many uses for QR codes in the classroom. This particular project shows students how to create a QR code that links to their class folder. Why? You can have them save everything they have created in your class into this folder and parents and administrators will automatically be able to open it up during a walk-through and Open House. It's the easiest way to share print, audio, visual, and multimedia presentations! I tell the students that their photos are my bulletin boards, but what they put into their folders is their bulletin board!
For more ideas on how to use QR codes in the classroom, search for QR codes on YouTube!
For more ideas on how to use QR codes in the classroom, search for QR codes on YouTube!
Step 1: Setting Up the Google Folder
It is important that Google folders be set up so that anyone with the link can view the student projects. This is especially important because the parents and administrators that you would like to use the QR codes do not have a district account.
This tutorial shows you how to create a Google folder for your class and how to change the setting so that anyone with the link can view the contents of your folder.
This tutorial shows you how to create a Google folder for your class and how to change the setting so that anyone with the link can view the contents of your folder.
Step 2: The QR Code Generator
This is a tutorial on how to add The QR Code Generator to your Google Apps and how to make and save the QR code to your class folder.
Note to teachers: Use your own smartphone to walk around and scan the codes as students make them. It will let them AND YOU know if they work before the students get to the point of making their photos! Plus it is great feedback for the kids!
Step 3: Your Chromebook Camera
This tutorial goes through the features of your Chromebook camera, plus how to take pictures and how to save them into your Google Drive.
Step 4: Setting Up Your Google Drawing to Create a Photo
Google Drawing is an excellent application to create photos, posters, and all kinds of other things you might like to make into a photograph.
This tutorial will walk you through how to proportionally set up a 4" x 6" photo using page setup.
This tutorial will walk you through how to proportionally set up a 4" x 6" photo using page setup.
Step 5: Creating Your Photo in Google Drawing
This tutorial goes through how to change the color of the background, adding a textbox for your name and changing the fonts, inserting your photo, cropping the photo, and inserting your QR code.
Note to Teachers: It is often easier to have students turn in their Google Drawing to you as a Google Drawing instead of as a jpg. The reason for this is that you can make a copy of it in your own Google Drive and make any corrections that need to be made on your own... especially if you are in a hurry to develop photos! If you do it this way, then YOU will need to go to File>Make a Copy>Save as JPG. If you plan to upload the files to someplace like Costco photo, this will be your best bet.
Make Your Photo Even More Interesting!
There are websites out there that can help you to make great headers or alter your photos as I have done on all of my pages. Click on the links below to explore!
